News
22 May 2019

Miking & Mixing Jazz In A Small Venue – Part Two

Subscribe to CX E-News
HOW TO
Miking & Mixing Jazz In A Small Venue – Part Two
by Greg Simmons.
In the previous issue I wrote about miking drums, double bass and piano for mixing jazz in a small venue, and discussed the different perspectives required for mixing jazz compared to pop and rock genres. In this issue I’m continuing the miking advice, and next issue I’ll look at soundchecking, monitors and mixing.
The advice given here is intended for use in small venues where the off-stage sound is a significant part of what the audience hears, therefore the emphasis is on mics and placements that complement the off-stage sound with maximum GBF (Gain Before Feedback) and minimum fuss.


Miking the organ
 The Organ Trio consists of electric organ, drums and electric guitar. It’s the only jazz ensemble that does not have a dedicated bass instrument; the bass lines are provided by the organ and, in some cases, are played from a pedal board, which is essentially a huge piano keyboard designed to be played by the organist’s feet.
Watching a jazz organist with a pedalboard is like watching a Thunderbird puppet on speed – their arms and hands are moving in a seemingly oblivious manner to their legs and feet, while their head is turning around cueing other musicians, checking the charts and acknowledging the audience.

It is a truly remarkable demonstration of physical and mental dexterity. If the bass lines from the organ are balanced properly with the drums and guitar, the results can be exhilarating. How that is done depends on the type of organ.
Most contemporary designs and emulations have stereo direct outputs that provide a convenient and clean way of getting the sound into the PA – although the level of the bass lines relative to the rest of the organ’s range may not be what you need to balance the bass lines against the drums and guitar, and you may find yourself resorting to some carefully tuned and subtly manipulated LF shelving to keep it sitting right.
Here’s a tip based on a recent discussion on this very topic with one of Sydney’s top organists: create a bass channel by splitting the DI signal into another channel, roll off all the tops and add a touch of compression. I haven’t tried it, but it makes a lot of sense.
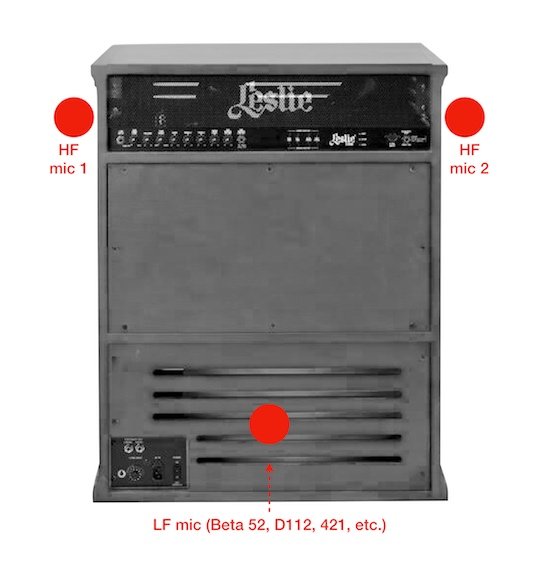
Sometimes an organist would bring in the classic combo of a Hammond B3 organ, which has a mono direct output (see the tip in the previous paragraph), and a Leslie Tone Cabinet (aka ‘Leslie’) – a highly-revered two-way speaker enclosure with a built-in tube amplifier.
The Leslie is to organists what Marshalls are to rock guitarists, and once you hear one you’re not going to want the direct sound. The big challenge is doing it justice through the PA.
The enclosure is divided into three sections. The amplifiers and drivers are in the middle section, but that’s not where the sound comes out; a low frequency driver faces down onto a rotating baffle or rotor in the bottom section, and a HF compression driver faces up into the top section and drives a pair of back-to-back rotating horns.
Note that only one of them is actually a horn; the other is a mirror-image dummy to provide balance and prevent wobbling. That bit of knowledge changes everything when it comes to microphone placement.
I always used three mics on the Leslie and was more fussy about where they were rather than what they were. I used any of the standard kick or bass mics on the bottom section of the enclosure to capture the low frequencies, rolling off everything above 1.6kHz or so (the Leslie’s crossover point is around 800Hz).
I’d pan that centre and found it provided a good way of balancing the energy of the bass lines against everything else. Then I’d place a mic on either side, at the centre of the slots at the top of the cabinet that allow the high frequencies to come out, and pan them hard left and hard right.
On a small stage the Leslie is typically jammed in between the organist and the drums so it is prudent to use cardioids here and make sure the one closest to the drums has its back facing the drums for maximum rejection. I found that condensers in this position picked up too much mechanical noise and spill, and got better results with a pair of Sennheiser 421s set one or two clicks before the M position.
The mic placements I’ve just described are standards that you’ll find at the top of a Google search, but in a small venue where the off-stage sound is a significant part of what the audience hears I sometimes got a more impressive result by moving those top mics towards the enclosure’s rear corners. This created a gap in the PA’s stereo image that was filled in with the off-stage sound of the horn passing by the front of the cabinet.
If you’ve got enough channels, take the organ’s Direct Out, split it to create the bass channel as mentioned earlier, mic the Leslie, check the polarities and blend it all together. Electric organs through Leslie cabinets are supposed to sound exciting; if yours isn’t, fix it.
Rhodes electric piano
There’s not much to say about this easy-going and beautiful-sounding keyboard, which is just as well because I’ve devoted so much space to the electric organ in this issue and the grand piano in the previous issue. It’s a simple DI job that comes with a built-in gotcha for the uninitiated: the output jack is marked ‘Input’ on the early models. Not helpful…
Miking electric guitars
Most jazz guitarists in the smaller ensembles would settle for an SM57 with apathetic resignation, but would spark to life if seeing something less ‘rock’ going in front of their amp.
If I had to mic up a small ensemble that included grand piano, drums and electric guitar, and I only had one SM57, I’d be putting it under the grand piano (as described in the previous issue) and getting something else for the guitar amp. A 421 on M worked well in the small venue context. Ribbon mics of any type (except broken) were always worthwhile.
AudioTechnica’s AT5045 rectangular diaphragm cardioid condenser gets special mention for gigs that involve acoustic and semi-acoustic guitars played through high quality stage amplifiers – place it off centre of the speaker cone, about 20cm back, dip 4k by a couple of dB and don’t be surprised if you have guitarists on-stage and in the audience asking what it is, where they can get it and how much it costs.
For the Big Band genre I was happy with any microphone that allowed me to keep the guitar audible over the horns and drums without cranking the guitar amp to Metallica. SM57? Shure…
Vibraphone and other mallet percussion
The vibraphone and similar instruments (e.g. marimba, xylophone) consist of a series of tuned bars that are struck with mallets. Resonating tubes beneath the bars provide body and sustain, and sometimes pedals or motors control vibrato.
The trick here is getting the right balance between the attack of the mallet and the resonance of the tubes. There are many variables affecting that balance, making it irresponsible to suggest a one-size-fits-all mic placement. Instead, I’m going to describe my strategic ‘three step’ approach.
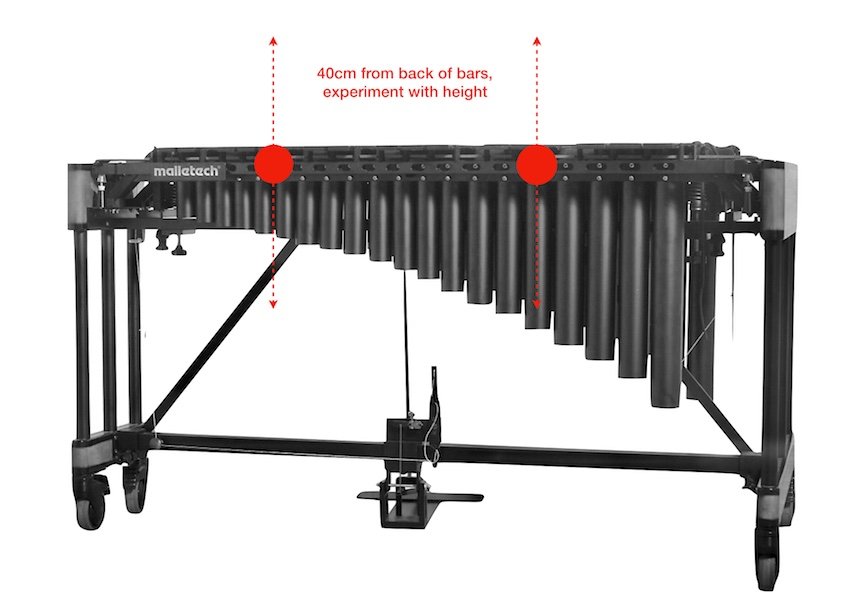
I start with a pair of cardioids or hypercardioids, one placed about one quarter of the way in from the left side of the instrument, the other placed about one quarter of the way in from the right side (count the bars, divide by four, you know the rest…).
I set up both mics so that they’re directly at the back edge of the bars but about 40cm away. This is a starting ‘reference’ point only. Based on the overall sound I’m getting from this reference position (FOH combined with off-stage) I decide what I need more or less of.
Moving upwards (while angling the mics down so they’re still facing the back edge of the bars) will provide more attack but less resonance. Moving downwards (again keeping the mics focused on the back edge of the bars) will provide more resonance but less attack. You should find the right placement within one or two moves from the starting point, hence ‘three moves’.
Once you get the right location in terms of height, check the balance of notes as the musician plays across the length of the instrument. You may need to tweak the spacing between the mics, the subtended angle between them, and/or their overall distance from the bars to make sure there are no dead notes or hot notes.
I got consistently useful results from this technique in a small venue with a pair of Rode M2 handheld condenser vocal mics, thanks to the M2’s tightly-controlled supercardioid polar response and relatively flat frequency response from 100Hz to 8kHz.
I bet a pair of BeyerDynamic M160s (hypercardioid ribbons) would also work well.
Some engineers prefer miking the vibraphone from underneath but I found that technique captured too much mechanical noise while also being too unfocused for reinforcing jazz in a small venue.
One thing you can be certain of: if there’s a vibraphone or similar in a small jazz ensemble it’s going to be playing solos at some point, so don’t treat it as an afterthought. As with piano solos and double bass solos, everyone watches the musician when they can hear it and the sound engineer when they can’t.
‘Working’ the microphone
All the miking suggestions discussed so far in this and the previous issue apply to sound sources that stay in a fixed position relative to the microphone (with the exception of the double bass, which has a limited degree of movement by pivoting around its endpin, as discussed in the previous issue).
The remaining instruments are all handheld and allow the musician to ‘work’ the microphone, which is a truly wonderful thing. Assuming you’ve got the monitoring right (discussed in the next issue), the musicians will move their instruments around their microphones to get the desired tone, volume and blend between themselves, thereby making your job as an engineer much easier.
Brass and woodwind
 Of all the instruments that fall into the brass and woodwind category, the sax family are the most commonly found in jazz. I never had a sax player complain about using an SM58 but had many say “Please, not a 57!”
Somewhere between 57 and 58 is a line that saxophonists don’t want to cross!
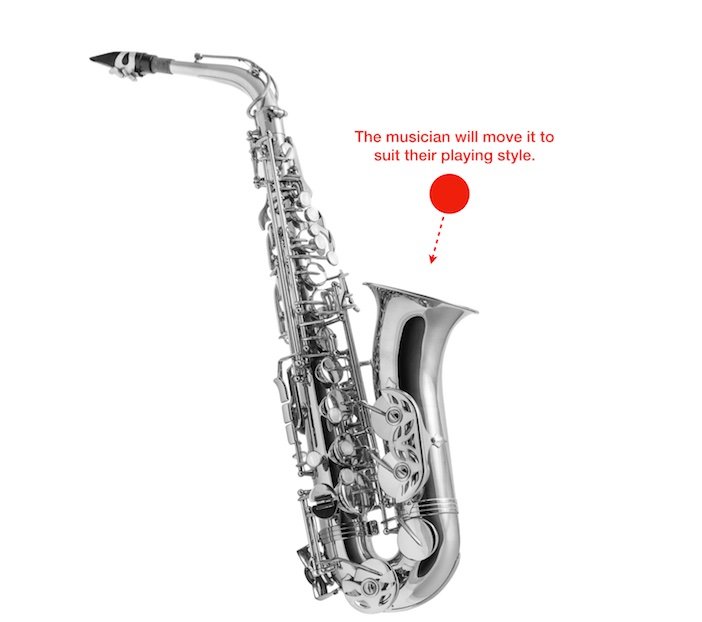
Most jazz saxophonists are very familiar with the SM58 and know how to work it. That ultimately translates to a better overall end result with less work on the engineering side in terms of tone and feedback rejection.
Place it on a typical boom stand, about 20cm above the bell and looking down into it, but don’t fuss too much about setting it up beyond that point because almost every jazz saxophonist I’ve ever worked with will tweak the microphone placement during soundcheck and sometimes during the gig, fine-tuning it to suit their playing style, their placement on stage, what they’re hearing, and how they like to ‘work’ the microphone to get the desired tones.
Be sure to give them traditional boom stands that are in good working order and don’t require pliers or gaff – unless you want some embarrassing stage moments. If you’re not comfortable with the idea of a musician adjusting the stand and positioning the mic as they the prefer it, don’t mix jazz.
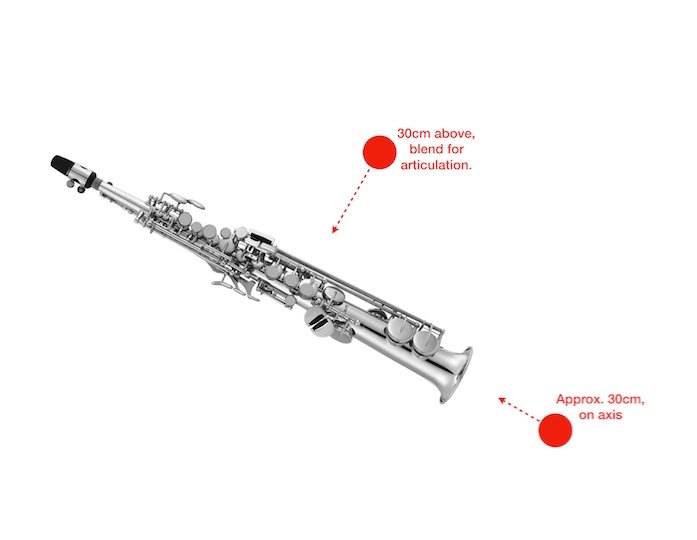
In the small venue I never needed more than one microphone on saxes, except the soprano. Place an SM58 on a small stand facing directly into the bell from about 30cm away, and another perpendicular to the body of the instrument and about 30cm above its centre.
Soprano sax players tend to sway around like snake charmers so you’ll need to keep both of those mics at a reasonable distance to maintain a consistent capture – hence the 30cm recommendation. Once you get the FOH and monitors sorted, the player will do the rest of the work for you, moving the mics or adjusting their playing position to make it work.
Trombone and trumpet players were always easy to please, being happy to use just about anything as long as it was on a tall stand directly in front of them. (Note that experienced trumpet players are familiar with the SM57 and, unlike saxophonists, don’t mind it at all.)
The sound from these instruments comes almost entirely from the bell, and the players tend to work the mic using subtle shifts in distance and moving the bell on- and off-axis to the mic – as long as the mic is directly in front of them, they’ll make it work for you.
Trombonists are particularly good at this, knowing that aiming their instrument directly at the microphone is precisely the wrong thing to do when they want to let out one of those unique ‘blat’ sounds that only the trombone can do. For moments like that, they’ll always turn themselves off-axis so that the mic is looking at the edge of the bell rather than down the throat… unless you upset them during soundcheck, in which case it’s probably payback.
Trust me, one of the last things you ever want coming through the PA in a small venue is an on-axis trombone ‘blat’.
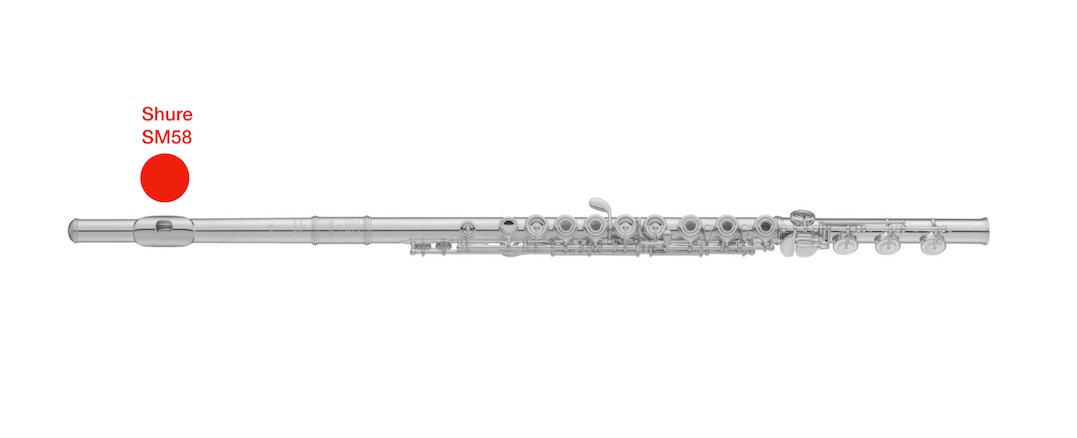
There are a few other woodwind instruments that show up in jazz from time to time, in particular the transverse flutes and the clarinets. The transverse flute can usually be miked just like a vocalist; set up an SM58 on a tall stand, sort out the foldback and the musician will take care of the rest. Most tend to get the mouthpiece right up close on the mic, some will ask for a foam pop filter and others will need it but won’t want it.
 Clarinets are difficult to amplify on a small stage at the best of times and often require two microphones as per the soprano sax approach mentioned above – although you might need more sensitive and flatter mics than the SM58s mentioned there, and that’s likely to invite feedback.
The bass clarinet is a gorgeous sounding instrument that is very difficult to amplify when sharing the stage with drums. Regular players of these subtle instruments have solved the miking problem by bringing their own clip-on microphones or pickups designed specifically for their particular instrument, and they’re definitely worth considering.
DPA’s 4099 is becoming very popular for these applications; it’s a supercardioid, but you’ll still need to be careful in terms of stage placement to avoid feedback when used on very mellow instruments.
The benefit of the clip-on is that the instrument is always ‘on mic’. If a brass or woodwind player shows up with their own microphone or pick-up system, be sure to try it first of all. If they’re used to being permanently on mic, it’s a safe bet that’s become part of their playing style.
Next issue: soundcheck, monitors and mixing…
CX Magazine – May 2019 – Entertainment technology news and issues for Australia and New Zealand – in print and free online www.cxnetwork.com.au
© CX Media
See also:
Part One – Miking & Mixing Jazz in a Small Venue (CX Mag – April)
Subscribe
Published monthly since 1991, our famous AV industry magazine is free for download or pay for print. Subscribers also receive CX News, our free weekly email with the latest industry news and jobs.
Recent posts


Latest jobs