News
8 Mar 2019

LED Mapping using the LED Blade CRE:ON controller
Subscribe to CX E-News
HOW TO
LED Mapping using the LED Blade CRE:ON controller
presented by TLC – The Lighting Collective.
LED Blade’s new CRE:ON controllers are extremely easy to configure and can be used via direct RGB control from a lighting console, or be pixel mapped and processed through a media server. In this article, we will go through the steps of how to connect your CRE:ON controllers to a lighting console and media server.
CRE:ON is a networked device that operates over Art-Net and sACN protocols. It is a power supply and a digital led strip controller in one, which can control up to 1000 RGB pixels all in one compact design and has an IP33 rating when the front panel is facing down. The CREON takes an input signal of either Art-Net or sACN and converts it to SPI protocol in order to address and control the LED Blade strips.


Network hardware
To have a stable network, using high quality cable and connectors is a must. Networks can be easily brought down by as little as a broken clip off a cheap plastic RJ45 connector.
That cheap blue CAT5 cable you can get from your local hardware store might work at first but won’t cut it for the rigours of the touring market. It’s designed to be pulled through a wall and left there.
Network switches are hugely important. Not only do they provide a space to tap into your network signal, they buffer all that digital information together and provide clear packets of data to be sent. Network issues can sometimes be solved by putting a switch in line to clear up the signal.

IP ranges
Art-Net and sACN networks have standard IP ranges of 2.0.0.x and 10.0.0.x. Your lighting console and CRE:ON controller must be in the same range. Be sure that no other devices are sharing the same IP address as that will cause a confliction and your network will most likely not work.
There are three methods of data casting:
• Broadcast – one device sending all packets of data to all devices
• Unicast – one device sending specific packets of data to one device
• Multicast – one device sending many packets of data to many devices
When it comes to large pixelmaps, it is recommended that you Unicast to your devices to prevent any network lag. This will be achieved from your lighting console/media server.
Art-Net universe addressing
Addressing Art-Net universes can be confusing as the first valid address is 0 and only 16 DMX universes can be sent down one subnet. See the below table for Art-Net universe settings.
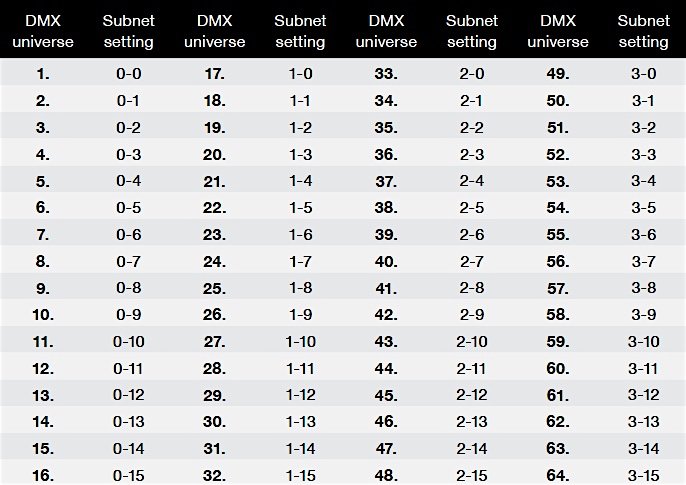
Thankfully LED Blade has simplified this process by being able to broadcast the subnet and only needing to address the universe number which will be one number lower than your actual DMX universe. DMX universe 17 would look like 0-16 on the CRE:ON unit.
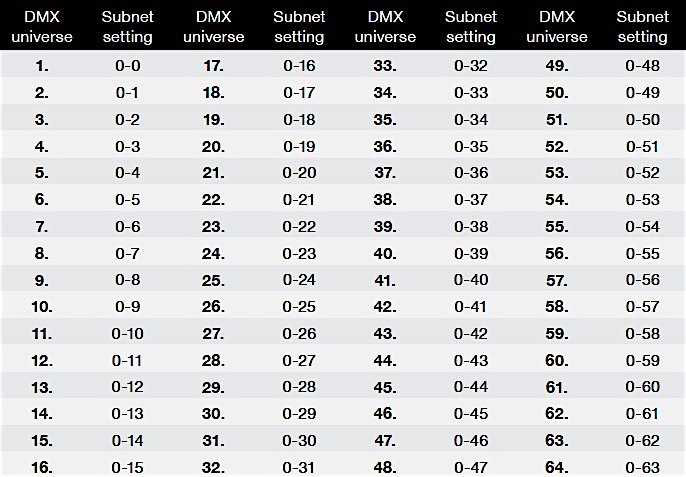
sACN universe addressing
Addressing sACN universes are much easier than Art-Net in which the first valid address is 1 and can carry up to 255 universes before needing to change your Hi/Lo(start/end) universes.
For example, a starting universe of 6 would be Hi 0/ Lo 6 (0-6) for the CRE:ON.
Setting up CRE:ON as direct RGB out of a lighting console
Let’s say you have one CRE:ON controller with 1000 pixels, and you want to control it directly from a lighting console without pixel mapping starting at universe 6 via Art-Net.
Consecutively patch 1000 x RGB fixtures starting from DMX 1 at universe 6.
• Connect the console and CRE:ON together via high quality cat6e cable, depending on cable lengths, a network switch may be needed.
• Check that the console and CRE:ON is in the same range of either 2.0.0.x or 10.0.0.x and that Art-Net /sACN is turned on and the desired RGB patched universes are UNICASTED to the CRE:ON’s IP address.
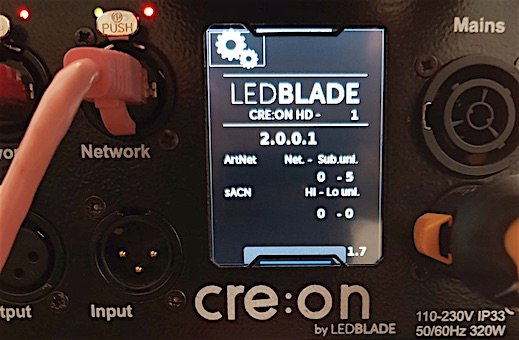
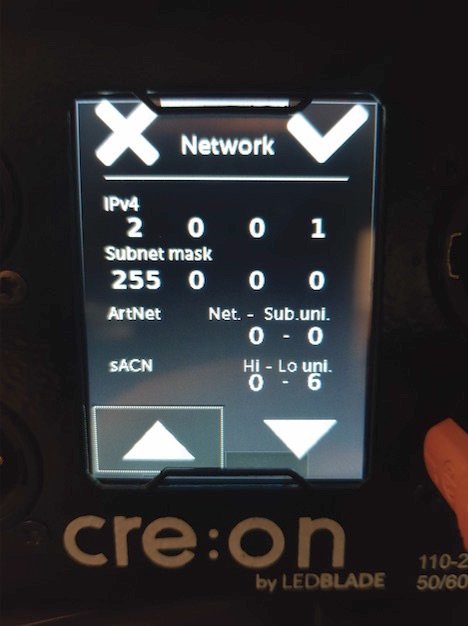
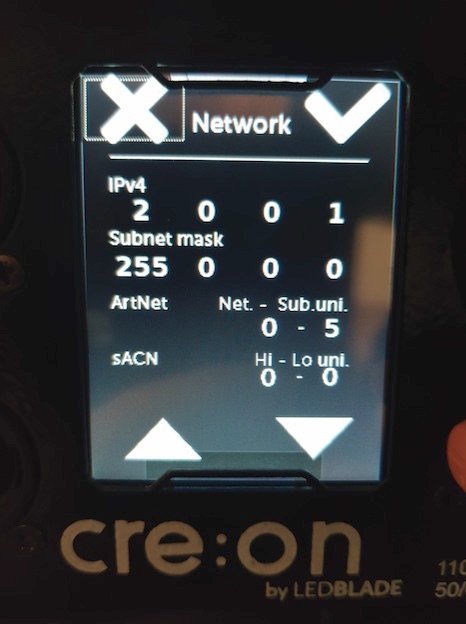
To address the CRE:ON’s starting universe, select the settings icon in the top corner of the CRE:ON’s touch screen, then enter the network menu.
• For Art-Net, your net – sub uni address will be 0-5
• For sACN, your Hi – Lo uni will be 0-6
• Save the settings by selecting the tick symbol
• Select the home icon to take you back to the CRE:ON’s home screen where you will see your updated settings displayed.
You will now have control over your LED Blade strips.
Setting up CRE:ON as a pixel mapped device
Pixel mapping is a way to control a large array of fixtures and sending video content to them. Most lighting consoles available now have this ability built in but do have their limitations. A more simple method for large arrays is to use a media server.
Patching a media server requires you to assign each fixture an X(horizontal axis), Y(vertical axis) and Z(depth for 3d) positions. Once you are happy with the layout of your pixels, you can start to address them.
Many media servers have their own specific ways on how to create a pixelmap and any user should know how to do so on the product they choose. I’m going to explain how to do so on MADRIX3 but the idea is similar across the board for media servers.
The two important things to remember is
1. UNICAST the desired universes to the desired CRE:ON’s IP and
2. The Led blade strips are addressed consecutively by the CRE:ON unit.
The setup I will be using will be 2 x CRE:ON with 10 x Ledblade strips each equalling 1000 pixels per CRE:ON unit. I will be using Art-Net and will be using universe 6 as my starting universe. My pixelmap will be quite simple by making a 100 x 20 grid (20 x LED Blade strips horizontal)
• Begin by setting up your network, remember the ranges to use are either 2.0.0.x or 10.0.0.x I will be using the 2.0.0.x range by assigning my PC that is running MADRIX to an IP address of 2.0.0.3 with a subnet mask of 255.0.0.0. Using a subnet mask of 255.0.0.0 makes the CRE:ON discoverable in a network.
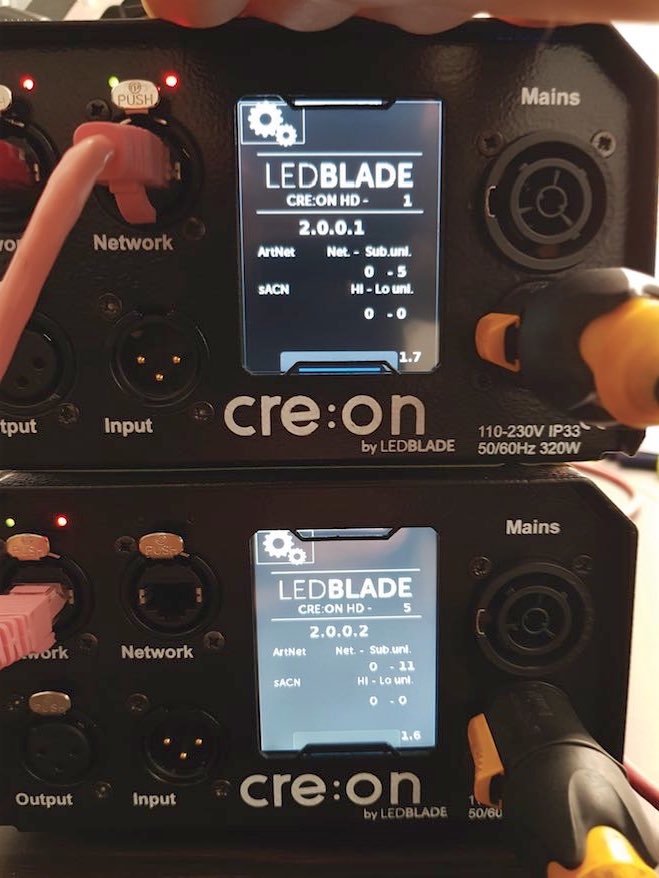
• I ’m going to keep it simple and assign CRE:ON #1 an IP of 2.0.0.1, because I will be using Art-Net, the subnet universe address will be 0-5.
• CRE:ON #2 will be addressed at 2.0.0.2, because 1000 RGB pixels take up 5.8 universes, the starting universe will be 12. The subnet settings for this CRE:ON will be 0-11.
• Connect your media server and CRE:ON controllers together with high quality CAT6e cable. Depending on your setup and cable length a switch might be needed.
• Open MADRIX3 and enter the device manager window.
• Select the Art-Net tab in the device manager window and click the magnifying glass icon in the bottom left corner to search for devices.
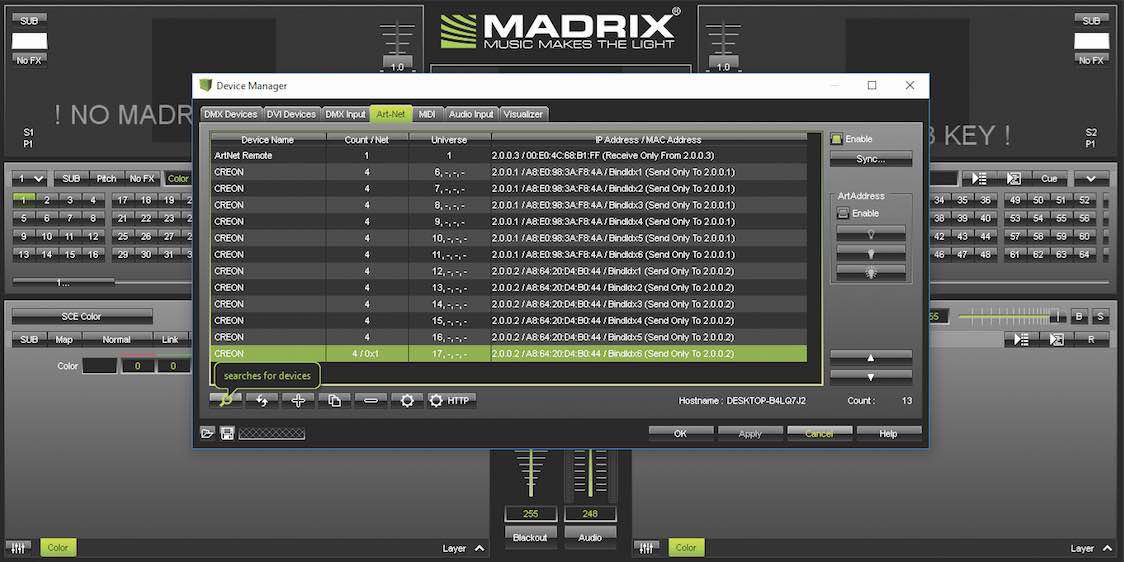
• The CRE:ON units will automatically be detected with the correct universes assigned.
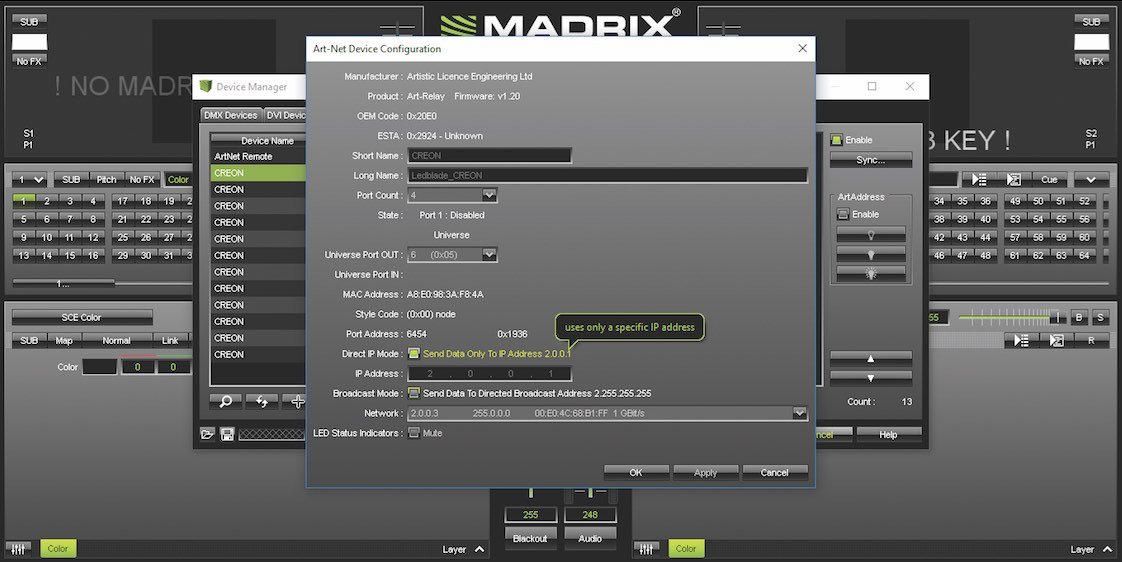
• Each CRE:ON should be in ‘direct IP mode’ (UNICAST).
• Next select the DMX devices tab, and enable each CRE:ON unit to begin output.
• Now open the patch editor where we will create the pixelmap.
• Patch each CRE:ON individually.
• Open the add fixtures tab, select the generic RGB 1 pixel library.
• Our count will be X=100 Y=10 Z=1
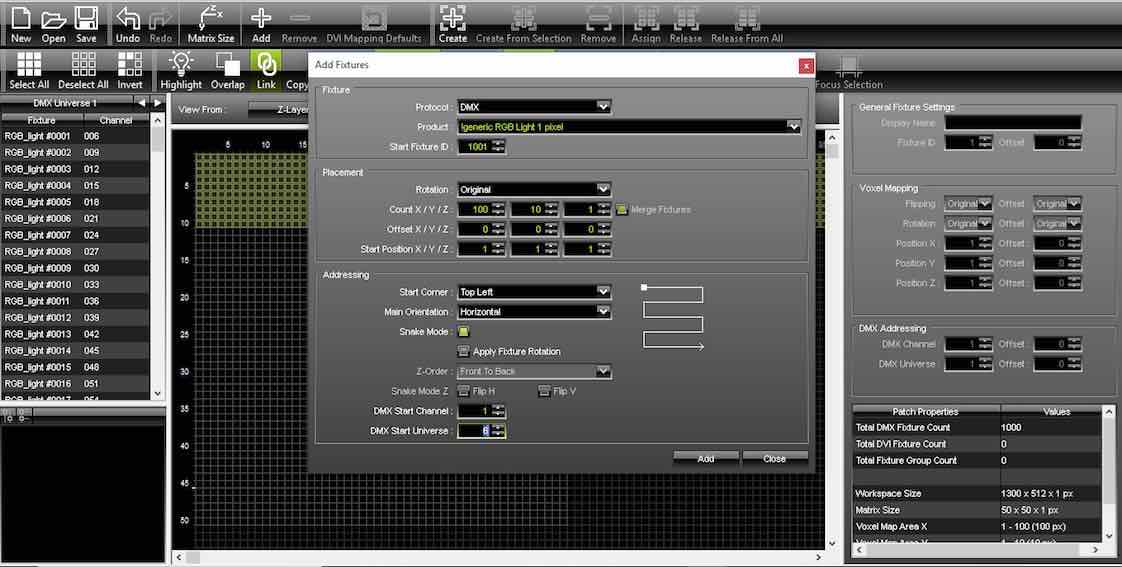
• Next, we need to select the direction of assignment. These strips will be running horizontally.
• The CRE:ON sends addresses consecutively and by selecting snake mode will allow the pixelmap to also do this.
• Set the starting universe at 6 and starting address at 1 and add.
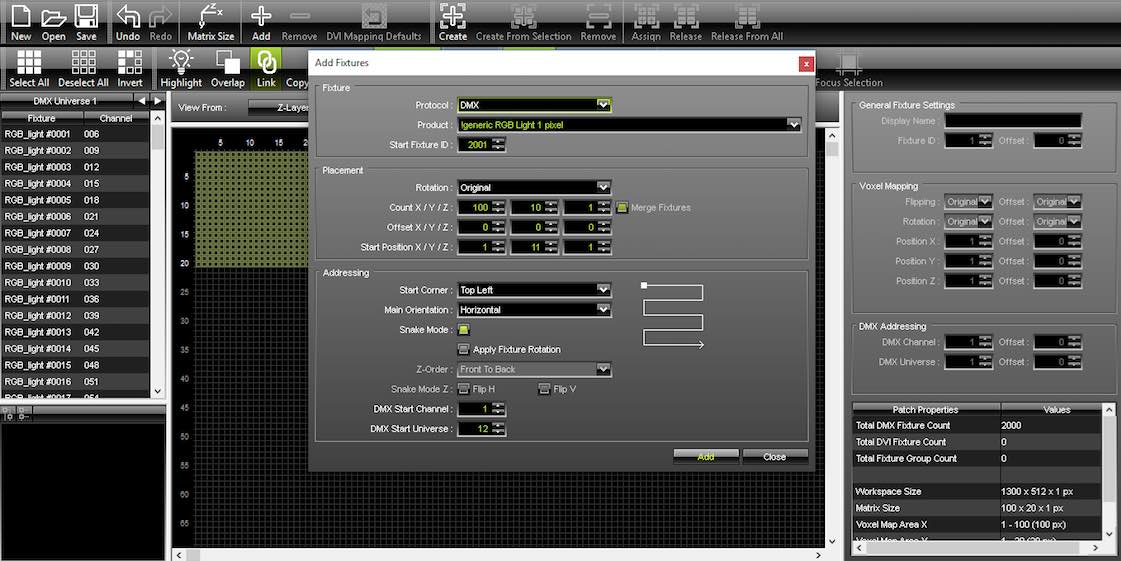
• To patch CRE:ON #2 we need to change the starting position to X = 1 Y = 11 Z=1 this will drop the next 1000 pixels to sit underneath our first 1000 pixels.
• Change the starting universe address to 12 and add.
You will now have control of your LED Blade strips.
Have you ever arrived at a load in where there’s no plots, equipment lists or even a general plan of what is needed? All these things are needed for a successful and efficient show. The same goes with pixel mapping and networking.
The key to a successful pixelmap is planning and to understand networking.
Some key tips are:
• Draw up a network plan of your system and include as much information as you can, IP addresses/starting DMX addresses
• Use high quality hardware and cable
• Be sure that all network hardware is not sharing the same IP address
• Decide whether to broadcast or unicast to your devices
“Draw up a network plan with the location of your devices and include their IP and universe settings. This way you have a visual refence to work out what will be needed before you arrive at load in and I cannot stress how much this helps when you are trouble shooting.”

From CX Magazine – March 2019.
CX Magazine is Australia and New Zealand’s only publication dedicated to entertainment technology news and issues – available in print and online. Read all editions for free or search our archive www.cxnetwork.com.au
© CX Media
Subscribe
Published monthly since 1991, our famous AV industry magazine is free for download or pay for print. Subscribers also receive CX News, our free weekly email with the latest industry news and jobs.
Recent posts