News
5 Apr 2019

An Introduction to Pixels
Subscribe to CX E-News
PIXELS
An Introduction to Pixels
VJ Suriya from Australian lighting control experts ENTTEC takes us through what you need to know in order to get started with LED pixels.
What does pixel mean?
We get asked a lot about pixel strips (sometimes known as ‘smart strips’, ‘intelligent strips’, addressable strips, media strips/flex and a multitude of other names depending on the brand).
The first thing that most people want to know is exactly what pixel strips do and how they differ from standard RGB LED strips, which we’re all pretty familiar with already. A pixel strip is a flexible circuit board populated by multicoloured, addressable surface-mounted (SMD) light-emitting diodes (LEDs). It usually has an adhesive backing for quick and easy installation.


Whether it takes the form of a flexible strip, dots, or tiles, the commonality of pixels is that – unlike a standard RGB strip – each LED has its own chip which means it can be controlled to respond individually (e.g. change colour, switch off etc).
Pixel strips can still do everything that standard RGB tape can do … only more!
How it all comes together
Once you or your lighting designer have looked over your space and decided where you’re going to need pixel strips, and of what length, you can then get into the nitty-gritty of putting a system together.

Say you had a 5m x 7m area where you wanted to put a grid of pixels on the ceiling to provide lighting and dynamic patterns. Let’s assume you wanted a strip every metre. That comes to a total of 5 x 7m strips, and 7 x 5m strips.
Colour
No matter which supplier you go to, you’ll soon discover that pixels come in a range of colour and voltage options. In terms of colour, the most common would be RGB, where each LED is able to produce the colours red, green and blue. When all are on together, they produce white light. However, this requires the LED to be running at its maximum capacity, which means you’ll be using a lot of power.
If your system is going to be playing a lot of white colour effects, or you want finer control over the white you are displaying, you can usually opt for an RGBW strip. Each pixel here can still produce the standard red, green and blue hues, but also has an additional dedicated white LED. This usually makes the strip more costly, but lets you have greater control over the colour and brightness of the white you are displaying.
Some situations like architectural installations may not need the RGB colour range at all, instead only requiring white hues ranging from warm to cool (think circadian lighting, for example). In these cases, you can use another type of tape: WWA – which stands for Cool White/Warm White/Amber.
Mixing these 3 hues can give you precise control over the temperature and brightness of your white displays.
Voltage
When it comes to pixels, voltage is usually limited to 5V and 12V. The main difference between the two is that the maximum run length possible will differ, i.e., the distance that a pixel tape can run before the effects of voltage drop kick in- and do keep in mind that our goal should be to minimise any voltage drop.
You can imagine electrons flowing through your pixel strip as being like water flowing in a pipe. The voltage is like the water pressure in the pipe. If you don’t have much pressure, the water won’t go very far before it starts to slow down to a trickle.
Similarly, if you have lower voltage, the electrons can’t travel as far before their “pressure” – voltage – decreases. How this relates to your project, is that the lower your voltage, the shorter your maximum run length will be.
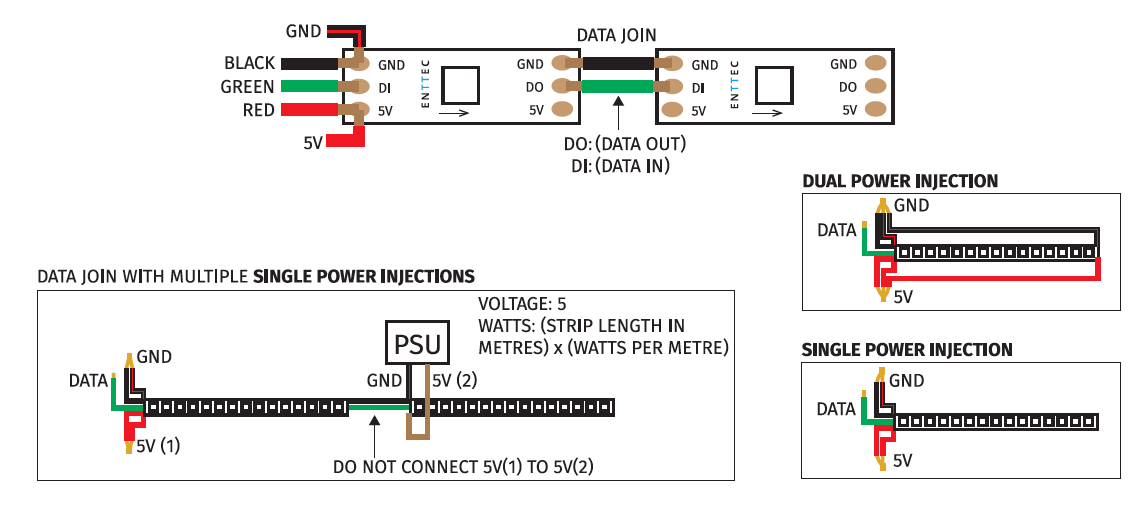
ENTTEC provides handy installation guides which tell you what the run lengths are for each of our pixel strips. For example, here’s the run length table from one of our most popular pixel strips, 8PL60-F (5V RGB):
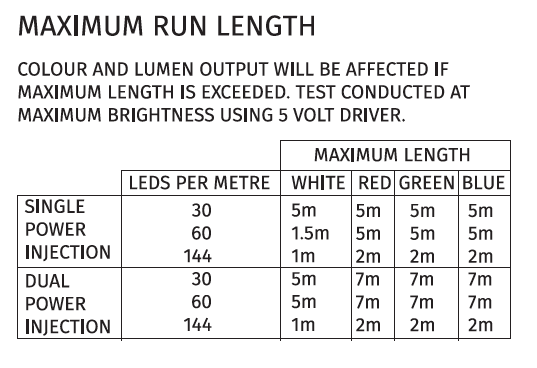
As you can see, with our 60 LED/m tape, the maximum run length with single power injection is 1.5m on white, and 5m on the colours (the wiring schematics below show what we mean by single or dual power injection).
White is always going to result in a lower run length than the colours, because it is using up more power, so it will drop the voltage faster. In our water-flowing metaphor, the LEDs are like little turbines that use the flow and pressure of the water to produce power, only on pixel strips, they are using the current to produce light instead.
But back to the project!
When designing a system, it is always more prudent to consider the maximum output of the strip i.e. white output. This ensures that no matter what the system is pushed into doing, it won’t be overloaded or possibly malfunction.
We can see from the table above that the max run length for white output is only 1.5m on the 60LED/m strip, while it is 5m with dual injection. Remembering that our project is comprised of 5m and 7m lengths, this means that for the 5m lengths, we will need to ensure power is injected from both ends.
Although 7m exceeds our maximum run length, it is still achievable – it just means we will just need additional power injections, for example, we could do one at the start, end and middle.
Let’s remember that we also have the 12V strip which we haven’t looked at yet. ENTTEC also has a 12V tape in 60LEDs/m. Here is its run length table:
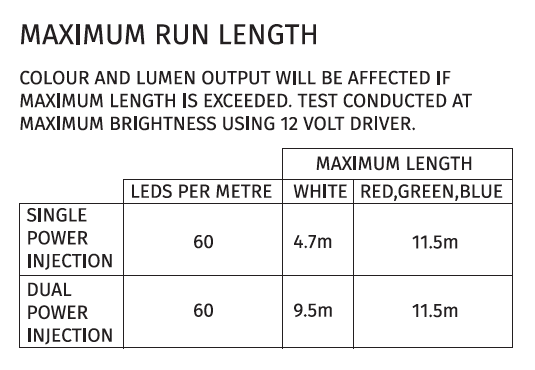
We can see here that the run length with dual injection is up to 9.5m for this strip. Therefore, by switching to 12V, we could do our 5m lengths and our 7m lengths without having to inject power in the middle of the 7m run!
This is where you have a decision to make as a designer: Do I go with a more expensive strip which is easier to install? Or a cheaper one that is more difficult to install. In most cases, we would recommend going with the option that is easier to install. Electricians can be expensive, so limiting their time on site could save you more than the slight increase in equipment cost.

Control hardware
Now that we’ve decided upon the type of strip and checked that we can run the lengths required; the next step is to determine what kind of controls we need to run everything. To explain the controls, you will need to look briefly into what DMX is and how it works.
There are many valuable online resources that will help you with this, including lighting designer David Henry’s excellent Learn Stage Lighting website. Once you’ve familiarized yourself with the basics, you’ll understand what we mean when we say that a pixel strip is also DMX-controlled.
The DMX channels on your pixel strip will depend on the available colours. For example, an RGB strip will have DMX channels for red, green, and blue separately. Since a pixel strip’s whole purpose is that it is individually controllable, this means that each LED will have these 3 channels associated with it.
For example, the first LED might use channels 1, 2, and 3, while the second LED uses channels 4, 5, and 6 and so on down the rest of the tape. Knowing this, you can figure out how much control ‘capacity’ you need to control your setup.
Looking back to our project, we have 5m lengths and 7m lengths. Each 5m length will have 60LEDs/m, and each pixel uses 3 channels, therefore, the 5m length will use a total of 900 channels.
Remembering that 1 DMX universe is 512 channels, this means that each 5m length will be just under 2 universes. This also means each 7m length will be 1260 channels, which is just over 2 universes.
At ENTTEC, we have a wide range of controller options that are suited to projects of different types and scales. To home in on which kind of control system to use, we should first calculate how many universes in total we need to control.
As we calculated before, each 5m length is 900 channels which is 1.8 universes – lets round up to 2. And each 7m length is 1260 channels which is 2.5 universes. Therefore, in total that comes to 14 universes for the 7 x 5m strips, and 12.5 universes for the 5 x 7m lengths. Let’s round this up to a total of 27.
Which controller type is most cost effective for your scale of project?
Our project is ~27 universes, so we could use either the Pixelator, Pixel Octo or Pixel Triton. For the sake of comparison, let’s take a look at how a typical set-up might look for this project using each of these three control devices…
 1
1
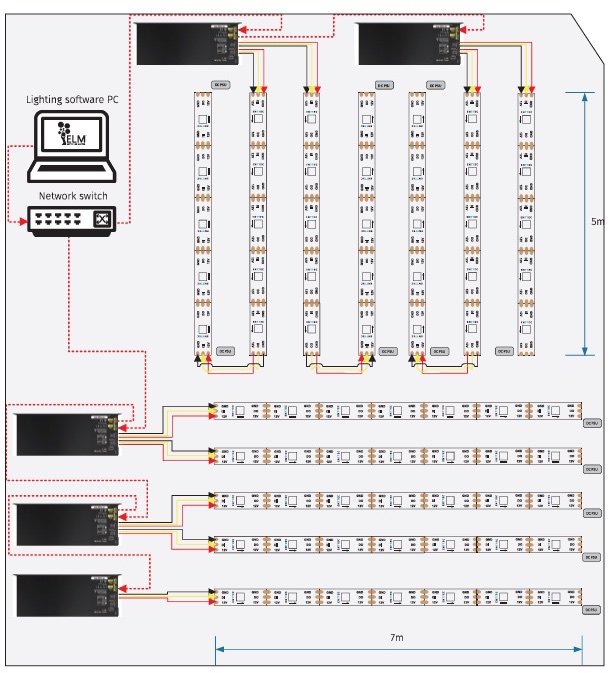
Using a Pixelator
The Pixelator/PLink option lets you do up to 2 universes of output per PLink injector. This is fine for the 5m lengths, as these are just under 2 universes. For the 7m lengths however, which are just over 2 universes, this is a bit inconvenient, as the 7m length needs to be broken down into 2 sections so that we can meet the data requirement.
 2
2
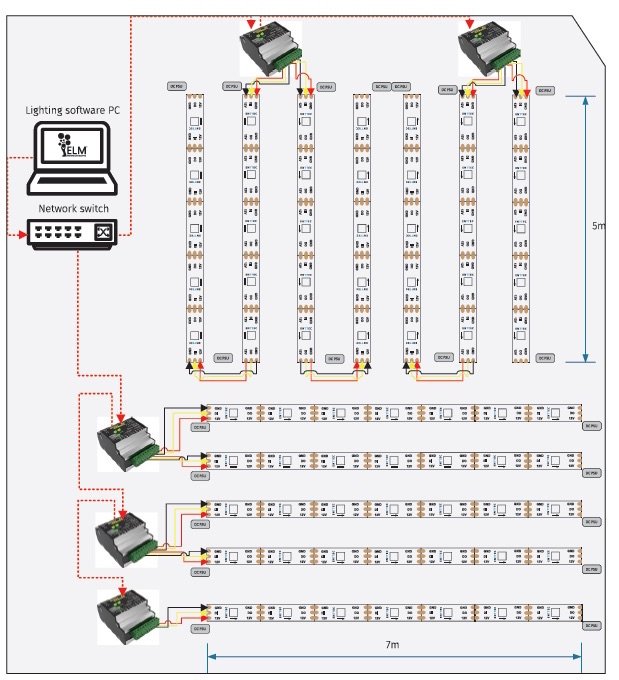
Using a Pixel Triton
The Pixel Triton has the same configuration of data output in that it has 2 x 4 Universe outputs just like the Pixel Octo. This means it will have a very similar layout to the Octo. The difference is that the Triton comes with its own on-board power supply, so you will need fewer additional power supplies in your layout. In terms of power output, the Triton packs a whopping 300W. You’ll only need the additional power supplies to overcome any voltage drop throughout the strip section.
 3
3
Using a Pixel Octo
As you can see, the option using the Pixel Octo is a lot less crowded in terms of controllers. Always keep in mind that if all these different controller options/layouts get confusing, do feel free to reach out to the helpful customer service team at ENTTEC who will happily assist you with your design.
Mounting
So, you have chosen your pixel strips and decided on your controller layout, the next question is how you’re going to mount the strips to your chosen surface(s). Pixel strips usually come with an adhesive strip on the back, so … can we simply peel the backing off and stick the strip down?
NO!
All LEDs, whether regular RGB or pixel, tend to heat up during operation. If this heat generation is not managed, over time the high temperatures can deteriorate the LEDs, possibly causing some or even the whole string to fail.
ENTTEC always recommend mounting the tape to a clean, heat conductive surface. We have a range of purpose made aluminium extrusions for this.
Aluminium is a great material for this since it is easily accessible, light, strong, and has a high thermal conductivity to help wick that heat away. Whether you use an extrusion, a piece of flat bar/u-channel, or even aluminium sheet/plate, just remember to clean down the surface with alcohol. You may be surprised at the amount of dirt and grease you find on your cloth.
Control software
When it comes to controlling simple RGB strips, it’s easy enough to use a simple colour dial controller and a 3 or 4 channel DMX driver to control your strips. With pixels, however, you have control over each individual pixel. If you controlled these with colour dial controllers, you would need a lot of controllers!
 This is why pixel projects are usually controlled by pixel mapping software. We go into a lot more detail about pixel mapping on our website, but the crux of it is that you essentially draw out your LED configuration in a mapping software and save this configuration
These pixels are now ‘mapped’ so now you can play media over the top of your pixels, and they will light up accordingly.
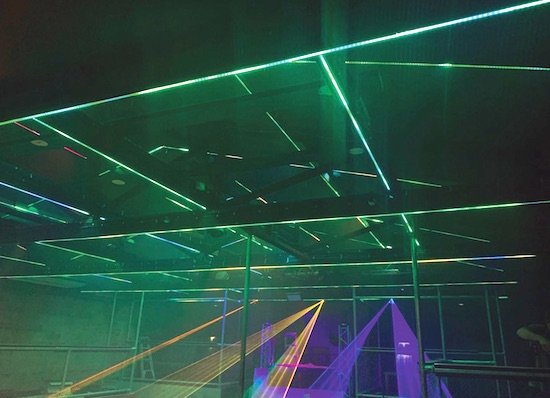
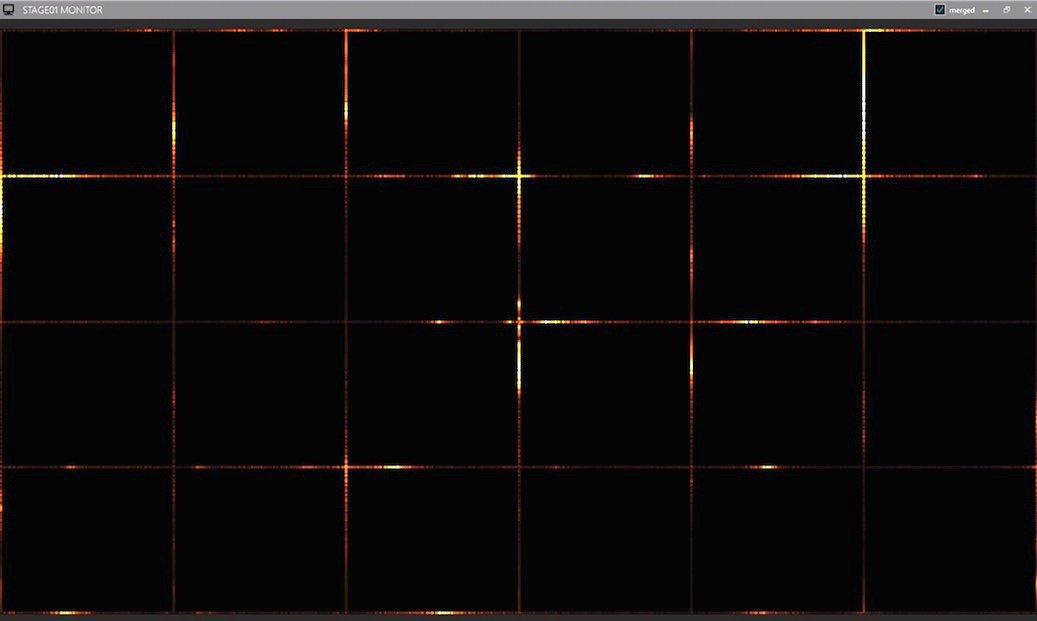
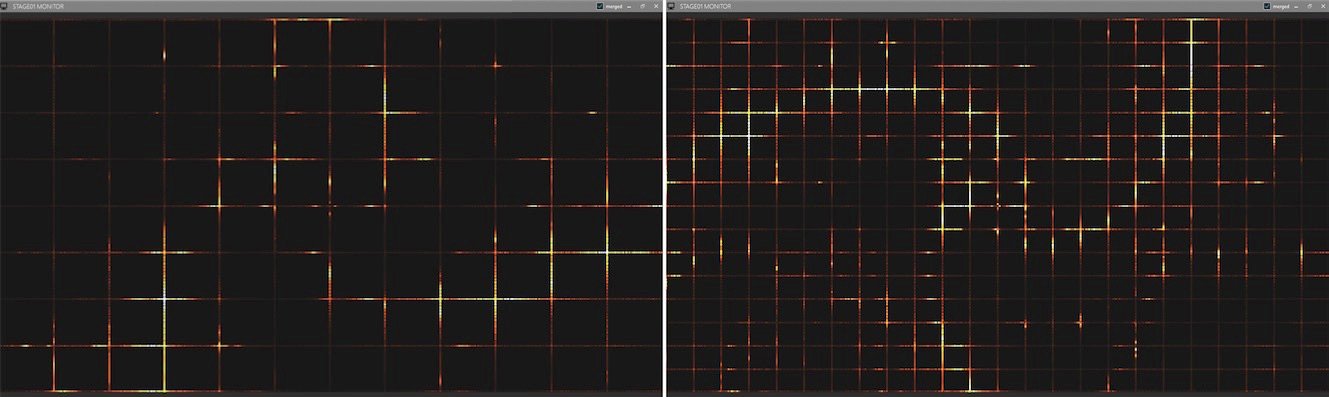
Below you can see what our pixel ceiling looks like in the award-winning ENTTEC LED Mapper (ELM) software. The effect that is superimposed on there is the “noise flow” effect from ELM’s pattern library. And below, you can see what the LEDs would look like if that pattern was played out through the controllers.
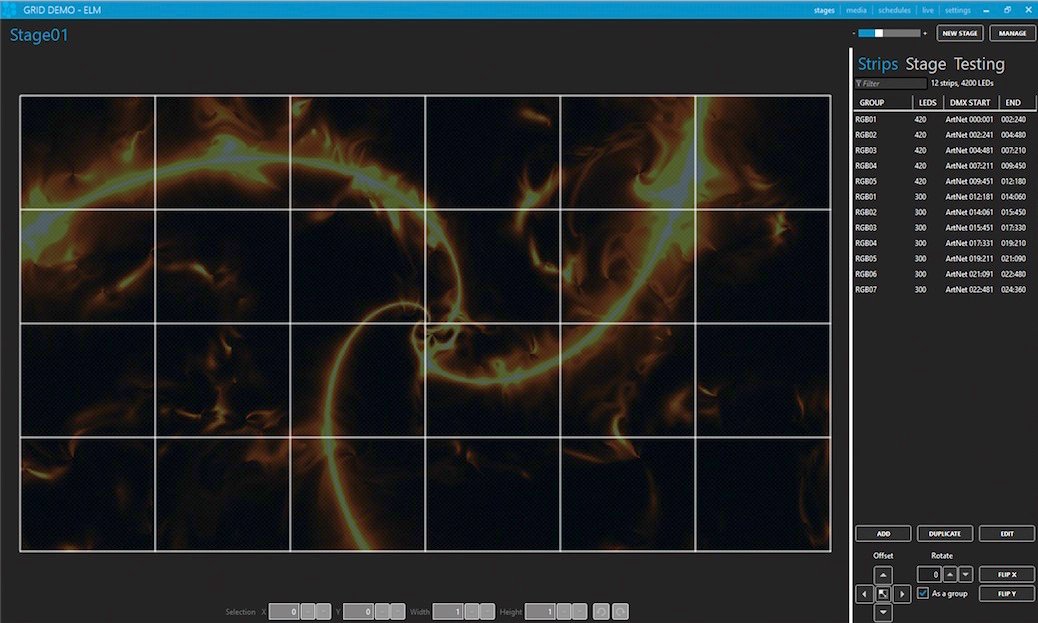
ELM lets you import all sorts of media to light up your pixels. You can do something as basic as static images, but there is also a library of dynamic visual effects. You can import video data for example from a YouTube video or live streaming data through NDI. You can even sync to a webcam and be playing your video feed in real time over your LEDs.
Of course, the grid above is a fairly low-density display. Pixel effects can get really elaborate when you increase the density of your pixels. You can see from the following pictures that as you increase the number of strips, the display becomes much more impressive. The cost price also becomes a lot more impressive however!
So again, this is something for you to weigh up as a designer.
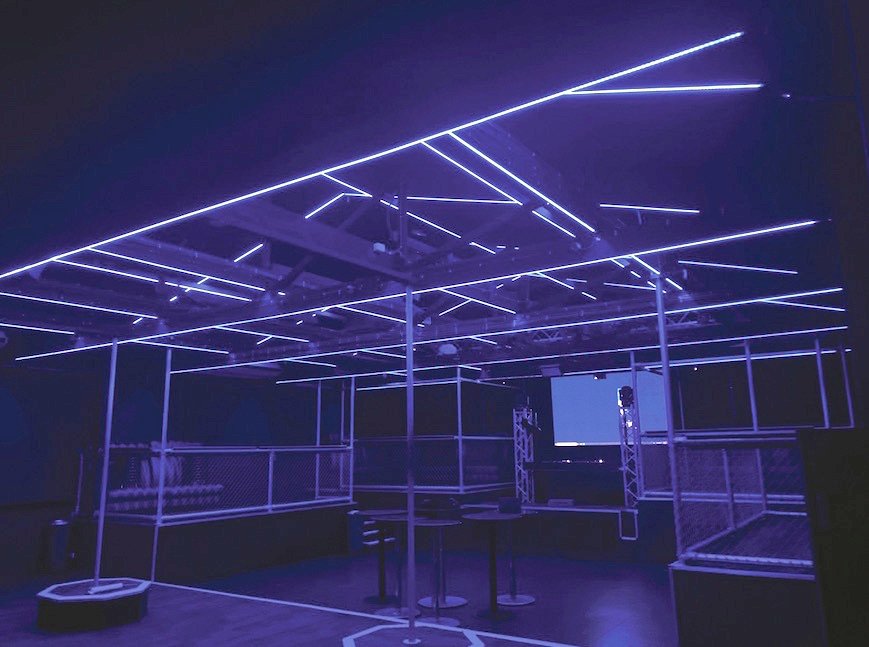
But don’t be disheartened if your budget doesn’t allow for a high-res screen worth of pixels! A touch of pixel mapped LEDs as part of a larger project can really bring a space to life. Just look at what the folks at Beyond Imagination Entertainment were able to do for RSQ Nightclub in Adelaide using ENTTEC pixels.
-

- RSQ Nightclub in Adelaide
-
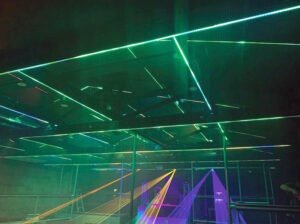
- Project and images by Shane Hogen and the team at Beyond Imagination Entertainment

LED Mapping software is usually sold in licenses/versions that are sized by number of DMX universes they let you map out. When deciding on a size of software license to purchase, it is very tempting to simply look at the amount of tape you have in total, do a simple calculation for number of channels, divide by 512, and base your purchase on that. If you calculate it this way, you’ll often find yourself short on universes!
Let’s take the PLink layout option for example. If you do a simple calculation based on the number of LEDs we have:
> 70m of tape all up
> 60 LEDs per metre – giving us 4200 LEDs
> 3 channels per LED since we’re using RGB -giving us 12,600 channels
> divided by 512 channels per universe -giving us 25 universes.
In reality we have 17 PLink injectors in total, most or all of them would be using over 1 universe each, so would be rounded up to using 2U each, giving us a total of 34U.
With ELM, if you hadn’t purchased enough universes, you could easily jump online and purchase another license to add to your universe count. But it is more cost-effective if you simply buy the larger license to begin with. This also lets you work on bigger projects or expand your systems in the future.
Conclusion
So there you have it! A comprehensive manual on designing pixel systems! Well, not quite – there is a
bit more to it – but this will get you started on the right track. Just remember if any of this gets too confusing or time-consuming, you are more than welcome to reach out to the team at ENTTEC. We’d be happy to help you with your lighting control needs.
ENTTEC – www.enttec.com | (03) 9763 5755 | sales@enttec.com.au
![]()
From CX Magazine – April 2019
CX Magazine is Australia and New Zealand’s only publication dedicated to entertainment technology news and issues – available in print and online. Read all editions for free or search our archive www.cxnetwork.com.au
© CX Media
Subscribe
Published monthly since 1991, our famous AV industry magazine is free for download or pay for print. Subscribers also receive CX News, our free weekly email with the latest industry news and jobs.
Recent posts


Latest jobs